Apple APNs 使用指南(通俗版)
Apple Push Notification service (APNs)是苹果的推送服务,本身使用挺简单,但是由于步骤比较繁琐,下面纪录一下的具体步骤。
第一步,新建App IDs/获取推送证书
首先登陆https://developer.apple.com/account/ios/identifiers/bundle/bundleCreate.action注册一个App ID,带push功能的app,必须是Explicit App ID,填入你的项目Bundle ID,App Services的地方一定要勾选Push Notifications。Xcode的项目Bundler Identifier一定要和这里填入的Bundle ID相同,对于已经建好的项目,如果想新加入push功能,需要在Xcode的设置中(快捷键Command+.)的Accounts-View Details点击左下角刷新按钮。重新build项目就可以了。
转到https://developer.apple.com/account/ios/certificate/certificateCreate.action,新建一个推送证书。需要用到keychain工具
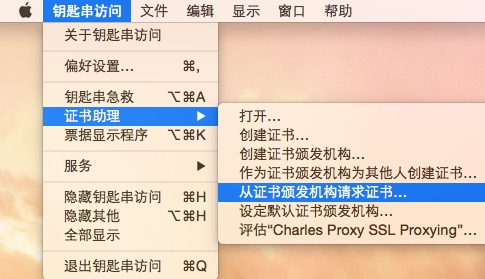
然后把申请的证书下载下来,双击打开,在keychain中,右键导出为p12格式,一定要记住密码(可以留空)。假设我们到处的文件为:/ramdisk/server_certificates_bundle_sandbox.p12。留到第三步用。
第二步,获取设备token
需要修改AppDelegate.m:
- (BOOL)application:(UIApplication *)application didFinishLaunchingWithOptions:(NSDictionary *)launchOptions {
    // Override point for customization after application launch.
    //-- Set Notification
    if ([application respondsToSelector:@selector(isRegisteredForRemoteNotifications)])
    {
        // iOS 8 Notifications
        [application registerUserNotificationSettings:[UIUserNotificationSettings settingsForTypes:(UIUserNotificationTypeSound | UIUserNotificationTypeAlert | UIUserNotificationTypeBadge) categories:nil]];

        [application registerForRemoteNotifications];
    }
    else
    {
        // iOS < 8 Notifications
        [application registerForRemoteNotificationTypes:
         (UIRemoteNotificationTypeBadge | UIRemoteNotificationTypeAlert | UIRemoteNotificationTypeSound)];
    }

    return YES;
}


- (void)application:(UIApplication*)application didRegisterForRemoteNotificationsWithDeviceToken:(NSData*)deviceToken
{

    NSString *deviceTokenStr = [[[[deviceToken description]
                                  stringByReplacingOccurrencesOfString: @"<" withString: @""]
                                 stringByReplacingOccurrencesOfString: @">" withString: @""]
                                stringByReplacingOccurrencesOfString: @" " withString: @""];

    NSLog(@"%@\nDevice Token: %@",[UIDevice currentDevice].name, deviceTokenStr);
}

- (void)application:(UIApplication*)application didFailToRegisterForRemoteNotificationsWithError:(NSError*)error
{
    NSLog(@"Failed to get token, error: %@", error);
}

- (void)application:(UIApplication *)application didReceiveRemoteNotification:(NSDictionary *)userInfo
{
    NSLog(@"\napns -> didReceiveRemoteNotification,Receive Data:\n%@", userInfo);
    //把icon上的标记数字设置为0,
    application.applicationIconBadgeNumber = 0;
    if ([[userInfo objectForKey:@"aps"] objectForKey:@"alert"]!=NULL) {
        UIAlertView* alert = [[UIAlertView alloc] initWithTitle:@"**推送消息**"
                                                        message:[[userInfo objectForKey:@"aps"] objectForKey:@"alert"]
                                                       delegate:self
                                              cancelButtonTitle:@"关闭"
                                              otherButtonTitles:@"处理推送内容",nil];
//        alert.tag = alert_tag_push;
        [alert show];
    }
}
第三步,向Apple的服务器发送消息,以便Apple转发给设备
APNs格式在apple官网:https://developer.apple.com/library/ios/documentation/NetworkingInternet/Conceptual/RemoteNotificationsPG/Chapters/CommunicatingWIthAPS.html 其实就是和apple的服务器建立一个socket连接,然后发送数据。关键是,不能一个设备/一条消息建立一次连接,这样成本太高,而且太慢,还会让apple认为是DDOS攻击,所以推送消息的时候,最好一次推送完,再close socket。java版的示例代码:
import java.io.ByteArrayOutputStream;
import java.io.DataOutputStream;
import java.io.FileInputStream;
import java.io.IOException;
import java.io.InputStream;
import java.net.Socket;
import java.security.KeyStore;
import javax.net.ssl.KeyManagerFactory;
import javax.net.ssl.SSLContext;
import javax.net.ssl.SSLSocketFactory;

/**
 * 测试apple推送服务。千万不要一个用户建立一次socket连接,这会被apple认为是ddos攻击。<br>
 * apple 文档:https://developer.apple.com/library/ios/documentation/NetworkingInternet/Conceptual/RemoteNotificationsPG/Chapters/ApplePushService.html#//apple_ref/doc/uid/TP40008194-CH100-SW9
 */
/**
 * @author loganliu
 *
 */
public class APNs {
	/**
	 * @param args
	 */
	public static void main(String[] args) {
		String keyPath = "/ramdisk/server_certificates_bundle_sandbox.p12";
		String ksType = "PKCS12";
		String ksPassword = "";
		String ksAlgorithm = "SunX509";
		String deviceToken = "f3d7e7e9edb36d22a78e78449e7a1faa724d8fe08cd1183d2e2822f8e0d2bd72";
		String serverHost = "gateway.sandbox.push.apple.com";
		int serverPort = 2195;
		// System.setProperty("socksProxyHost", "127.0.0.1");
		// System.setProperty("socksProxyPort", "8889");
		try {
			InputStream certInput = new FileInputStream(keyPath);
			KeyStore keyStore = KeyStore.getInstance(ksType);
			keyStore.load(certInput, ksPassword.toCharArray());
			KeyManagerFactory kmf = KeyManagerFactory.getInstance(ksAlgorithm);
			kmf.init(keyStore, ksPassword.toCharArray());
			SSLContext sslContext = SSLContext.getInstance("TLS");
			sslContext.init(kmf.getKeyManagers(), null, null);
			SSLSocketFactory socketFactory = sslContext.getSocketFactory();
			Socket socket = socketFactory.createSocket(serverHost, serverPort);
			StringBuilder content = new StringBuilder();
			String text = "你好世界";
			content.append("{\"aps\":");
			content.append("{\"alert\":\"").append(text)
					.append("\",\"badge\":1,\"sound\":\"").append("ping1")
					.append("\"}");
			content.append(",\"cpn\":{\"t0\":")
					.append(System.currentTimeMillis()).append("}");
			content.append("}");
			byte[] msgByte = makebyte((byte) 1, deviceToken,
					content.toString(), 10000001);
			System.out.println(msgByte);
			socket.getOutputStream().write(msgByte);
			socket.getOutputStream().flush();
			socket.close();
		} catch (Exception e) {
			e.printStackTrace();
		}
	}

	/**
	 * 组装apns规定的字节数组 使用增强型
	 *
	 * @param command
	 * @param deviceToken
	 * @param payload
	 * @return
	 * @throws IOException
	 */
	private static byte[] makebyte(byte command, String deviceToken,
			String payload, int identifer) {
		try {
			byte[] deviceTokenb = decodeHex(deviceToken);
			ByteArrayOutputStream boas = new ByteArrayOutputStream();
			DataOutputStream dos = new DataOutputStream(boas);
			byte[] payloadBytes = payload.getBytes("UTF-8");
			dos.writeByte(command);
			dos.writeInt(identifer);// identifer
			dos.writeInt(Integer.MAX_VALUE);
			dos.writeShort(deviceTokenb.length);
			dos.write(deviceTokenb);
			dos.writeShort(payloadBytes.length);
			dos.write(payloadBytes);
			return boas.toByteArray();
		} catch (IOException e) {
			e.printStackTrace();
			return null;
		}
	}

	/**
	 * hex representation string to bytes
	 *
	 * @param s
	 *            input hex string
	 * @return byte array
	 */
	public static byte[] decodeHex(String s) {
		int len = s.length();
		byte[] data = new byte[len / 2];
		for (int i = 0; i < len; i += 2) {
			data[i / 2] = (byte) ((Character.digit(s.charAt(i), 16) << 4) + Character
					.digit(s.charAt(i + 1), 16));
		}
		return data;
	}
}
这样我们的app就能收到推送消息了。